If you’re the owner of a Shearwater dive computer and clicked through the info screens, you may have seen this:
Fig, 1
And if you’re a technical diver using the Bühlmann ZHL-16C algorithm, then I’m certain you’ve seen some kind of visualization of M-values and gradient factors (GF) according to Erik Baker:
Fig, 2
In this blog post, I would like to take a minute and explain how the two are connected.
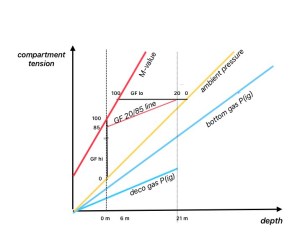
First, let’s take a look at the Shearwater compartment graph and how the manual explains it.
Fig. 3
The graph displays all of the 16 compartments and their inert gas tensions relative to inspired inert gas pressure, ambient pressure, and M-value.
When the inert gas tension is below ambient pressure, the compartment bar is green. For compartment tensions above ambient pressure and below the M-value (positive GF between 0 and 1), the compartment bar is yellow. Above the M-value (GF > 1, not recommended), the bar turns red.
The cyan (blue) vertical line indicates the inspired partial pressure of inert gas P(ig). All of the (theoretical) compartments converge on this limit at different rates over time from either side, and you can see if a compartment is (theoretically) on or off-gassing.
Please note that since M-value parameters (zero pressure crossover a and gradient b) are different for each compartment, the graph does not scale perfectly.
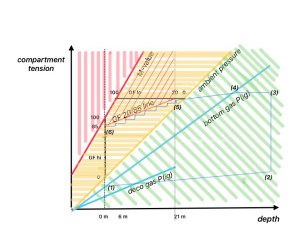
Fig. 4
In a Baker-esque diagram for a single compartment, the areas look like this (same-ish color coding):
Fig. 5. By now I’m sure you understand why my career in the arts went nowhere.
The section cross-hatched in both yellow and red (top center, above the GF line and below the M-value line) is not indicated separately in the “Tissues” graph. That is, the Shearwater graph does not account for personal gradient factor settings – even though the computer will of course calculate deco based on your configured limits and warn you if exceed them.
In fig. 5, you may have noticed a thin blue line with numbers from (1) to (6). This line shows the path of a single compartment (simplified) as the dive progresses.
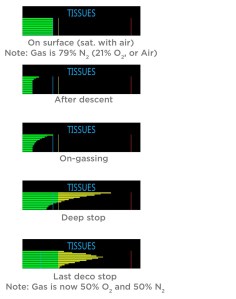
The Shearwater graph does a similar thing in real time during a dive, for all 16 compartments:
Fig. 6
If you take a close look at the bottom two graphs (roughly corresponding to numbers (4) and (5)/(6) in fig. 5, you can see that the cyan line (representing P(ig)) has jumped a bit to the left. This change represents the drop in inspired inert gas pressure at the switch from bottom gas to deco gas. Fig. 5 shows the P(ig)s for both gases in a similar color.
All clear? For questions or comments, please feel free to drop me an email via my Contact page.
Some months ago in the classroom of Tech Asia (Philippines), I came upon a little booklet of unambiguously antiquarian character: “Diving with the Aqua-Lung”, 11th edition, published by U.S. Divers in 1959.
The old-timey design caught my eye, and I succumbed to what my beloved sister has dubbed the “alphabet sickness:” a mental condition which causes those who suffer from it to, upon exposure to the written word, immediately drop whatever they were doing at the time and start reading compulsively.
The half-letter size booklet offers a fascinating glimpse into the early days of civilian scuba diving. It is a collage of Open Water Diver textbook, regulator maintenance manual, and guidance on setting up a filling station. It also has decompression tables, instructions on hookah diving, and even tips on how to start a dive club – all on a mere 40 pages of crisp, well-written prose. As an instructor and student of diving, I wish more training materials were like that… but I digress.
Stylistic merits aside, “Diving with the Aqua-Lung” has some nuggets of information to offer, one of which I’d like to spend a little more time on. In the third paragraph of the introduction, the authors drop this here (from a modern-day perspective) bomb:
Lets have that again: “The ear-drums […] will remain in a neutral state” simply because we breathe air at ambient pressure? That is, no active equalization? Yessir, you heard correctly. It is a description of what we refer to today as hands-free equalization, a technique that is considered quite advanced by modern standards, so advanced in fact that many scuba divers will never hear about it. Yet people took it for granted in the 1950s, ostensibly. Or did they? I’ll get back to that question in a bit.
How does it work?
Most divers learn about equalization only once, during their Open Water Diver training. “Gently exhale against your pinched nostrils. Very gently. Do you feel your ears pop? Yes? You sure? Cool, you’re good to go.”
That’s what my OWD instruction was like, and I’m sure many will find it familiar. It works… kind of. Unless the instructor is quite careful, divers instructed in this way somewhat randomly end up performing one of two equalization techniques. The luckier ones instinctively close their glottis and use a swallowing action to pump air into the Eustachian tubes – the Frenzelmaneuver. This is adequate, and the majority of divers, even instructors, never progress beyond this level.
The less lucky ones keep their glottis open and pump from the diaphragm – the Valsavamaneuver. The diaphragm is a much stronger muscle and more difficult to control. As a result, Valsalva divers more frequently report ear pain after diving, and the risk of barotrauma is greater. Such divers generally remain unaware of the cause – equalization probably won’t come up in future training, and you need to know what you’re looking for to tell the difference as an outside observer.
With either of the above techniques, the textbook instruction is to equalize frequently during descent, at least every couple of meters. For a dive to 60 meters, that’s a lot of equalizing.
Leveling up
What if, insteadof frequent, your equalization could be continuous? What if you could go all the way down to the bottom without touching your mask, and without feeling your ears? Welcome tohands-free equalization – the technique so casually alluded to in the introduction to our little booklet from – *checks calendar* – sixty-six years ago.
The benefits of this technique are twofold: On one hand, you will experience virtually no pressure changes on your ears during descent. Even if you think that’s no big deal and Frenzel is fine, once you experience hands-free, it’s like your neighbor’s kids finally turn off that gaming console they’ve been running all day long, to the point where you thought you’d stopped noticing the noise. You will notice when it stops and “your ear-drums […] remain in a neutral state.” It’s nice.
On the other hand, and this applies more to technical and CCR divers, you’ll have both of your hands free to signal during descent checks, operate your BCD, drysuit inflation valve, primary light, DPV, diluent MAV, or whatever other part of your kit might need your attention. Or you could just relax.
Hands-free is a superior equalization technique, once you’ve mastered it, and herein lies the crux. All the involved musculature is internal. Instructors can’t demonstrate the technique to students, only describe it,* which makes this method much trickier to teach than the nose-pinching styles. I strongly suspect that’s why hands-free equalization isn’t mentioned in modern scuba training materials. Freediving… different story. Those guys take equalization quite seriously.
So what about folks in the 1950s?
The booklet talks a little more about equalization in a section titled “Hints on Diving or Underwater Swimming”, subsection “Pains in the ears” (page 14). The authors explain how sinuses generally equalize by themselves, whereas the ears may take a little longer due to the small diameter of the Eustachian tubes.
They go on to describe two equalization techniques: (a) swallowing and (b) pressing the mask against the face and exhaling into it through the nose.** However, these techniques aren’t presented as essential, but merely as ancillary to a process that is taking place anyway. Nowhere in this booklet does it say, “as you descend, here’s how you equalize,” like modern training materials do.
In this sense, I believe it’s fair to conclude that hands-free equalization was considered the norm.
Trying to come up with an explanation for why that is and how, I believe things become easier to understand if you consider what kind of person would have gotten into scuba diving in the 1950s. At the time, new scuba divers very likely would’ve been practiced skin divers (to use the period term) already. After all, why would you go and buy a scuba unit if you didn’t like diving? And if you like diving, then you obviously know how to equalize. Case closed. To this day, Open Water Diver courses include a legacy skin diving section to reflect this history.
Equalization is significantly harder on breathhold dives, especially when going deep. A competent skin diver experiencing the Aqua-Lung for the first time would’ve been surprised by the relative ease: All you need to do is to allow the pressure in your lungs to propagate to the eardrums. Piece of cake.***
Taking a page from the Book of the Ancients
Today, beginner scuba courses need to accommodate the needs of people who don’t know how to equalize yet. And with modern masks that allow for nose pinching, the Frenzel maneuver is good enough, a lot easier to teach, and gets people under water quicker – crucial when a course is scheduled to take three days because people have flights to catch on day four.
However, this doesn’t mean you have to remain at that level. Much like trim, buoyancy control, finning, and other personal dive skills, equalization can be improved beyond the minimum requirements for passing an open-water course. Let the Ancients be your guide and learn the hands-free technique. Your ears will thank you.
If you enjoyed this article, you could do me a favor by going back to where you found it (social media) and giving that post a like, comment, and/or share. Cheers and safe diving, always!
Footnotes:
* The key to teaching hands-free equalization is finding a verbal instruction that makes the student do the right thing with the muscles in their throat. I find that “pretend you’re suppressing a yawn” tends to work for a lot of people. Even so, it usually takes some time and experimentation. But believe me, it’s worth your while.
** 1950s dive masks had very thick, stiff skirts and no nose pockets. Pinching the nose from the outside was just not possible; pushing the mask against the face and increasing the pressure inside by exhaling through the nose was the next best thing.Search for “Charlie Sturgill mask” to learn about the gold standard of diving masks at the time.
*** My own first exposure to scuba diving was a bit like that. Our training as junior lifeguards in late 1980s West Germany involved lots of skin diving (albeit only Frenzel equalization, no hands-free). Every now and then, one of the instructors would bring a couple of scuba tanks to the pool to spice things up.
Of course I do. Shut up already and take my money!
Jokes aside, going closed is a big decision, with ramifications that are not obvious at the time the decision is made. As a result, quite a few folks who take the training and maybe even buy a unit end up reverting to open circuit, thousands of [insert currency unit] in the hole.
To avoid such frustration, it is worth doing some research into the actual prerequisites, beyond mere agency standards, for making the transition to closed circuit a rewarding endeavor.
For this article in Alert Diver, I interviewed six renowned and prolific instructors to learn what it takes to become – and remain – a CCR diver.
Coming back safely from an ocean dive is more than a question of personal dive skills and a prudent approach to decompression. After surfacing, there is one more step: getting picked up by a boat. It sucks when that doesn’t happen.
From basics like DSMBs and good coordination with the crew all the way to personal locator beacons and other electronic communication devices, here is my review of ways and means to make sure you will be back home in time for dinner.
I’ve had a Testimonials page up for a while now, and people occasionally leave comments. You can find them here: timblmk.com/testimonials
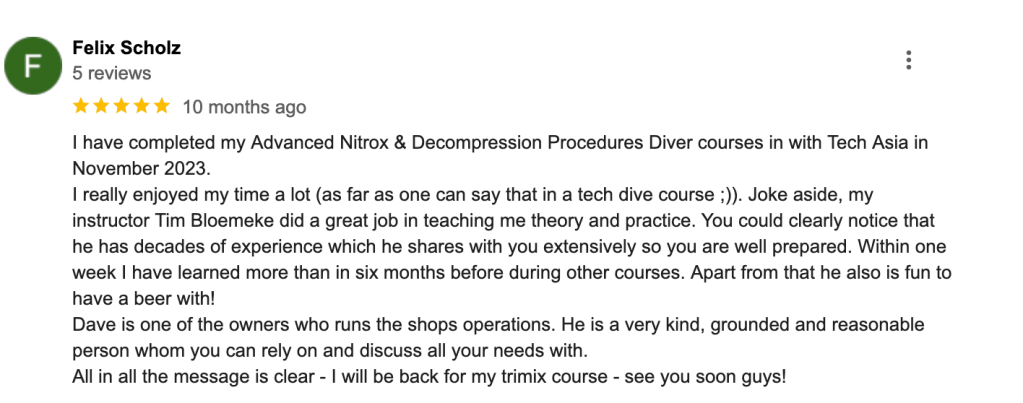
Here’s a couple more from the Google Reviews page for Tech Asia.
I feel deeply grateful for all the kind words. Feedback like this makes me feel like I’m on the right track, and inspires me to work harder to be the best dive professional I can be.
DPVs or underwater scooters are becoming increasingly popular, for good reason: They offer the opportunity to cover more ground, save gas by reducing exertion, and improve safety by enabling divers to push against currents. Plus, they’re a lot of fun.
However, the use of DPVs also comes with new ways to get yourself in trouble, so some training is absolutely necessary. For diving in open water, this training comes at two levels, recreational and technical. Below are the main features of each course.
Recreational
This course covers the basics of DPV diving, including
Dive planning taking battery life into account
Equipment pre-dive preparation and post-dive care
Water entry and exit
DPV use at the surface and underwater
Descents and ascents
Depth management in consideration of greater speed of movement
Gas monitoring and management while scootering
This course includes instruction on the above subjects on land, as well as two training dives on DPVs. It takes one to two days.
For recreational diving with relatively low-powered scooters, this is adequate. In these dives, a scooter is a non-critical piece of equipment, and (as in rec diving in general) major failures can be handled by simply aborting the dive, making a safety stop, and ascending to the surface. The focus is on having fun while maintaining safety.
Technical
In technical diving, a scooter becomes less of a toy and more of a tool. This course goes into quite a bit of extra detail to account for the additional equipment, planning requirements, tasks, and team procedures. We need to allow for the fact that in tech diving, immediate ascent to the surface is not available as an option for dealing with problems. In addition to the curriculum for the recreational course above, the following is included:
DPV rigging for one-handed use
User-level maintenance
Dive planning with gas, distance, and time constraints; coordination with boat crew
Buoyancy and trim
Team formation and cohesion, navigation, light signals, separation procedures
Managing DPV failures underwater
Towing a diver with a failed DPV
Gas sharing while scootering
Propeller entanglement procedures
“Parking” the scooter to enable other tasks like gas switches, DSMB deployment, etc.
Because of the greater scope of subjects, this course has a minimum of four hours of classroom and briefing time. Agency standards require two training dives to a maximum depth of 40 meters.
At Tech Asia however, we feel that two dives is a little on the low side to absorb the skills and build familiarity with the equipment, to the point where students are able to use scooters on technical dives safelywithout professional guidance. These things can be very distracting initially, and distraction is something we can’t afford. That’s why we offer this course with four dives, which are included in the price. Assuming no issues with skill development, the final two dives will be regular technical dives with DPVs at the student’s current level of training. Course duration is about three days.
So which one is for you?
If you just want to try your hand at something new and have fun with it, then the recreational course is fine. I’ve yet to meet a diver who doesn’t enjoy scootering.
However, if you plan on using scooters for tech dives, or if you’re the kind of recreational diver who enjoys getting into the nuts and bolts of things, then you may want to consider the more comprehensive, technical course. Note that you don’t necessarily have to be a technical diver to enroll. All of the skills taught can be practiced in recreational equipment configuration.
In the first part, I shared a personal close-call story and gave a brief overview of the carbon dioxide metabolism in the human body.
In the second part, we examined the mechanics of carbon dioxide generation and elimination, the complications introduced by depth and dive equipment, as well as the deeply unpleasant and potentially devastating effects of hypercapnia.
In the third and final part, I’m talking about ways and means at our disposal to prevent the kind of problems we spent the first two parts seeking to understand, avoid common mistakes, and become better and safer divers overall.
Excess carbon dioxide can be a source of danger at any level of diving, yet it is barely mentioned in course curricula. Here is part two of my three-part mini series for Alert Diver on the subject, in which I get into the nuts and bolts of how carbon dioxide affects us, and the special considerations we need to take into account when diving.
Carbon dioxide buildup is a common contributor to diving emergencies. In this first part of a three-part series for Alert Diver (EU), I’m sharing a personal experience and take a brief look at the metabolism of carbon dioxide in the human body.
Part two will focus on how the carbon dioxide metabolism is affected by diving, and what makes hypercapnia – excess CO2 in the bloodstream – so dangerous.
Part three will focus on countermeasures – skills and procedures to keep our CO2 load in check.